Setting Up a Backyard Fire Pit the Right Way
A fire pit is one of the best investments you can make in your backyard. Here's how to pick the right one, set it up safely, and actually use it.
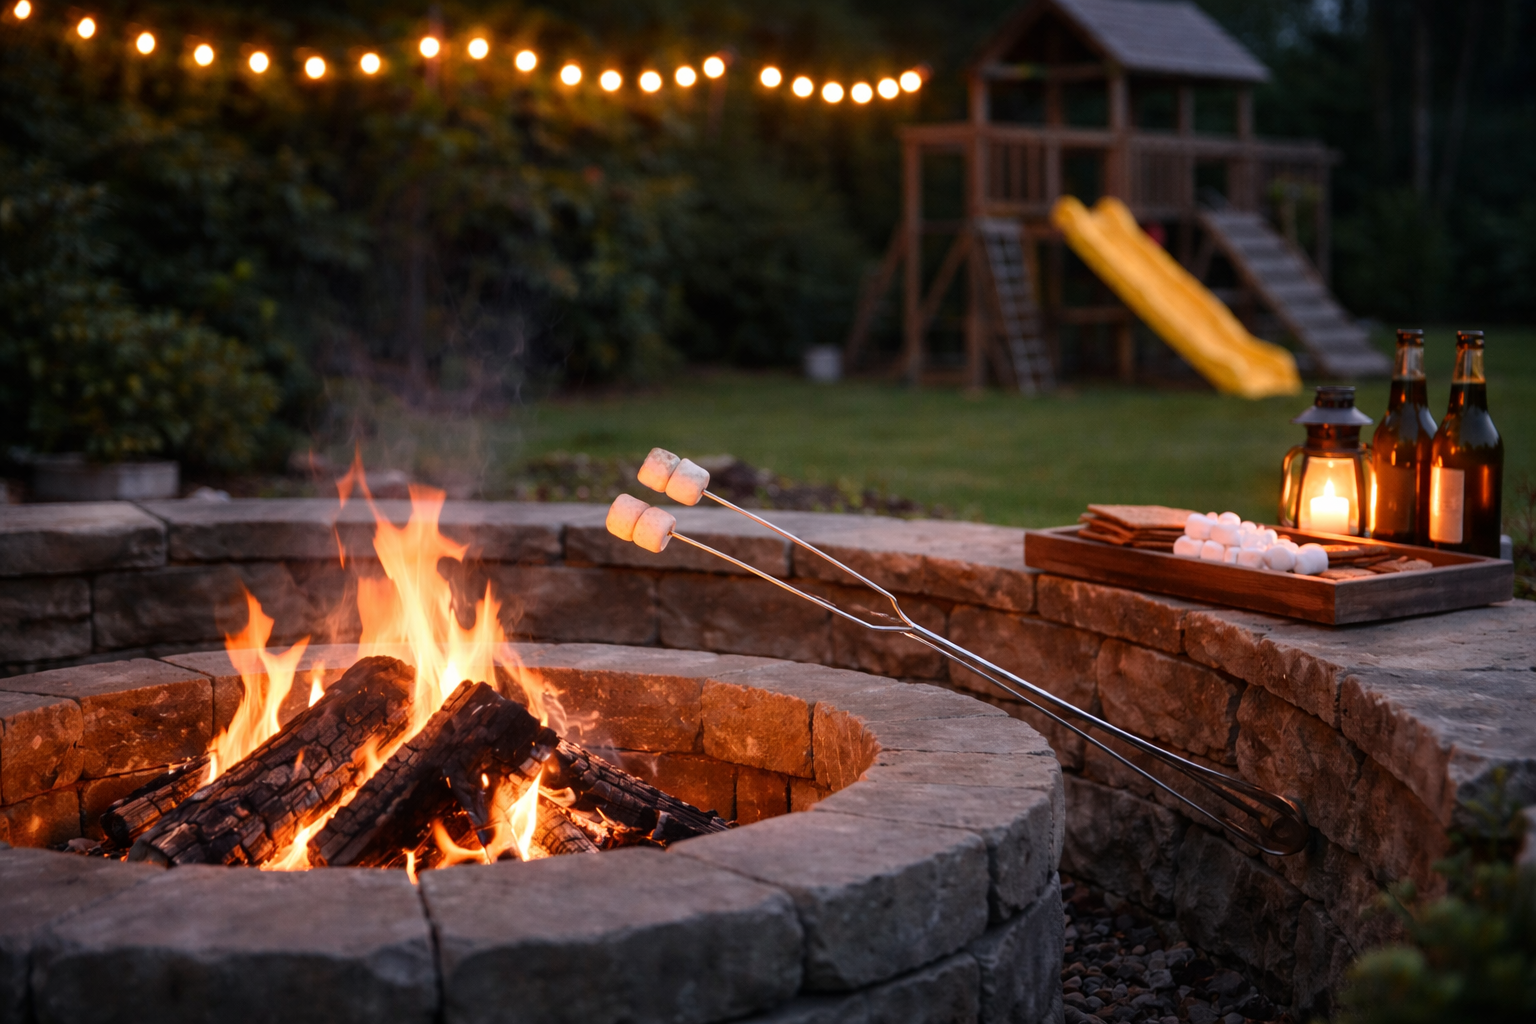
The night we finally set up our fire pit, we stayed outside until eleven o’clock on a Tuesday. My kids roasted marshmallows. We talked more than we had in weeks. I realized we’d been one fire pit away from having a backyard we actually used.
That was two years ago. Since then I’ve learned a lot — some of it the easy way, some of it the “why is there a dead circle in my grass” way. Here’s everything I wish I’d known going in.
Why a Fire Pit Is Actually Worth It
Fire pits are consistently the number one most-requested outdoor feature according to the American Society of Landscape Architects — ranking above outdoor dining, lighting, and everything else. And they deliver on the ROI side too: homeowners recoup up to 78% of fire pit costs at resale, and homes with well-designed outdoor fire areas sell faster. But none of that matters as much as the fact that your kids will voluntarily put their phones down to sit next to one. That alone is worth the price of admission.
Pick Your Type First
Before you buy anything, figure out which type of fire pit actually fits your yard and your life.
Above-ground ring or bowl is where most dads start, and for good reason. Setup is straightforward, cost is low ($100–$500 for a solid unit), and if you ever move or want to relocate it, you can. A bowl style gives you good airflow all around. A square or rectangular pit looks more modern and works well if you want seating on all four sides.
In-ground pit is more work but integrates better into the landscape and is naturally more wind-resistant since the flames sit below grade. If you’re planning a permanent install with a stone surround, this is the direction to go. Budget $500–$1,300 for a solid DIY version; professional installs run $2,500 and up.
Gas vs. wood is a real decision. Wood wins on experience — the crackle, the smell, the ritual of building the fire. Gas wins on convenience — you turn a knob, you have fire, you turn a knob, you don’t. If you have a tight suburban lot with close neighbors, or an HOA, gas is often the smarter call. It also produces 99% fewer particulate emissions than wood, which matters in areas with seasonal burn bans.
For most dads with a decent-sized backyard and kids who want the full campfire experience: wood-burning ring on a gravel pad. That’s what I have. No regrets.
Location: Don’t Eyeball This
This is the step people rush, and it’s the most important one. Here are the actual numbers:
- 10 feet minimum from your house, garage, shed, or deck — most codes say 10 ft, but 25 ft is the genuinely safe target
- 10 feet minimum from any fence
- 21 feet clearance from trees, shrubs, and overhead branches — look up before you set anything down
- Never on a wood deck — composite decking is not safe either
- Never on grass alone — more on that below
Check with your local fire department before you build anything permanent. Many municipalities require a burn permit or an inspection, and some have seasonal restrictions. Takes ten minutes to call and can save you a fine and an order to tear it out. HOAs often prohibit wood-burning pits outright but allow gas — check before you invest.
One more thing: note the prevailing wind direction in your backyard. Position seating so guests are upwind of the pit. You’ll thank yourself every single time.
Build a Proper Base
Setting a fire pit directly on grass is a mistake I see constantly. The heat kills the grass in an expanding circle, you end up with a bare mud patch that turns into a problem every time it rains, and stray embers can smolder in the root layer. Do it right once and you’ll never deal with it again.
For an above-ground ring on a patio or hardscape, you’re mostly set — just make sure the surface is level.
For a gravel pad (the most common and best-looking DIY setup):
- Mark out a circle at least 12 feet in diameter — larger if you want more seating room
- Remove the grass and dig down 4–6 inches
- Lay landscape fabric to suppress weeds
- Fill with angular 3/4” crushed gravel as a compacted base layer — angular stone locks together and doesn’t shift the way round stone does
- Top with 2–3 inches of pea gravel for the finish — it drains well, looks good, and is comfortable to walk on
Make sure the pad is level. A tipping fire pit is not a minor inconvenience — it’s a call to 911 waiting to happen.
Inside the pit itself: use sand or lava rock at the bottom, never river rocks or regular pea gravel. Round rocks with any trapped moisture can explode when heated. This is not a theoretical risk.
Size It Right
A 36-inch diameter fire pit is the sweet spot for most families — big enough for a real fire, small enough to manage. If you regularly host 6–8 people, go 48 inches.
Whatever size pit you choose, leave 3–5 feet between the pit edge and your seating. Too close and everyone spends the night dodging smoke and radiating heat. Too far and you lose the warmth. That gap is the whole game.
Build a Fire That Actually Lights
The three-stage approach is the only approach:
Tinder goes in first — dry leaves, cardboard strips, commercial wax fire-starter cubes, or fatwood sticks. This is what catches from a lighter.
Kindling (pencil-to-finger-thick sticks) goes over the tinder. This is what feeds the flame until it’s stable.
Fuel logs (split, seasoned hardwood) go on once the kindling is burning steady.
Never skip a stage. Trying to light a full log with a lighter is how dads spend 25 minutes looking incompetent in front of their family.
For structure, the teepee method works best for getting a fire going fast: tinder in the center, kindling leaned in a cone above it with a gap on the windward side to light through. As it catches, add larger kindling, then logs around the outside.
The log cabin method — alternating layers of logs stacked like Lincoln Logs with tinder inside — is better for a long, sustained burn, especially if you’re cooking over coals.
Use wax fire-starter cubes or fatwood. Skip the lighter fluid. It smells like petroleum, creates unpredictable flare-ups, and there’s zero upside over a $10 box of starters that work every time.
Use the Right Wood
This matters more than most people realize.
Best hardwoods to burn:
- Oak — the gold standard. Slow, hot, long-lasting. Needs 1–2 years of seasoning but worth it.
- Hickory — very high heat output, great for cooking, strong aroma
- Maple — steady burn, widely available, good heat
- Ash — burns well even at lower moisture content than most woods; easier to find seasoned
- Cherry — beautiful flame, pleasant mild smoke, medium heat
Always burn seasoned wood — dried for at least 6 months, ideally a year or more. Moisture content should be under 20%. How to tell: knock two pieces together. Dry wood makes a sharp “clack.” Green wood makes a dull thud. Green wood produces mostly smoke and frustration.
Woods and materials to never burn:
- Pressure-treated lumber — contains arsenic and chromium; the smoke is genuinely toxic
- Painted or stained wood — same issue; releases VOCs and heavy metals
- Pine and other softwoods — burns fast with a lot of sparks and heavy creosote; okay for starting fires but not for a sustained burn
- Plywood, OSB, or MDF — loaded with adhesive binders that release formaldehyde
- Pallets — often chemically treated; composition is unknown
- Ocean driftwood — the salt releases chlorine gas and dioxins when burned. Yes, really.
- Poison ivy, oak, or sumac — the urushiol in the smoke causes severe allergic reactions in the airways. This is a medical emergency, not a bad evening. Never burn vegetation you haven’t positively identified.
Safety Is Not Optional
The gear you need on-site, not in the garage:
- An ABC-rated fire extinguisher within arm’s reach of the pit
- A 5-gallon metal bucket filled with sand or water
- A spark screen — mesh lid sized to fit your pit, hinged opening preferred
- Long-handled poker and tongs (28–32 inches minimum so you never reach over the fire)
With kids around, set a clear no-run zone around the pit. Nearly half of pediatric burns from outdoor fires come not from sparks but from falls into the pit. One rule, clearly enforced, prevents almost all of it. When the fire is going, one adult’s only job is watching the fire — not talking, not looking at their phone, not going inside for a beer.
Putting it out properly: spread the ashes with a poker, pour water over everything while stirring, repeat until there’s no hissing. Touch the ash. If it’s still warm, keep going. Fire pit ash can retain enough heat to re-ignite for up to 72 hours. Don’t walk away from a fire pit you haven’t fully extinguished. Just don’t.
Accessories Worth Buying
The only things you actually need to start:
| Item | Why You Need It | What to Spend |
|---|---|---|
| Spark screen | Cuts ember travel dramatically | $25–$60 |
| Long-handled poker | Don’t reach over the fire | $15–$35 |
| Cover (weatherproof) | Keeps water out, extends the life of the pit | $20–$50 |
| Metal ash bucket with lid | Safe ash removal | $15–$25 |
If you want to cook over the fire — and once you try it, you will — add a swing-out grill grate and a cast iron Dutch oven. These will make you look like a hero at every backyard hangout from here on out.
Keep It Clean
Remove ash after every 1–2 uses. Wet ash turns into lye, which corrodes metal fast. Dry ash is acidic and does the same thing more slowly. Ash removal takes five minutes and adds years to your pit.
Wait 24–48 hours after the last fire before removing ash — it stays hot far longer than it looks. Use a metal scoop, dump into a metal bucket with a lid, store the bucket at least 10 feet from any structure. Cold wood ash can be composted in small amounts or used as a soil amendment in the garden — it’s potassium-rich and useful around ornamentals. If you’re mulching your beds too, check out the truth about mulch — ash fits into that system.
Always cover the pit when it’s not in use. A wet fire pit is harder to light and rusts out faster. If you’re putting it away for winter: full cleanout, remove and store any grates or lava rock indoors, shut off and disconnect gas if applicable, cover it well.
The Mistakes Worth Learning From (Other People’s)
- Eyeballing the clearance distances. Use a tape measure. Dads are notoriously optimistic about what “ten feet” looks like.
- Skipping the base prep. One afternoon of work prevents years of mud circles and drainage problems.
- Burning scrap lumber from a project. Treated lumber smoke is not worth whatever you’re trying to get rid of.
- Leaving the fire to “die out.” It won’t. Or it will, three hours later, when the wind picks up.
- Skipping the permit call. Ten minutes to call. Potentially a lot of money and hassle if you don’t.
The fire pit is out there two or three nights a week from April through November now. The kids ask to go outside instead of watching TV. We’ve had neighbors over more in the last two years than in the five before it. Best afternoon I ever spent in the backyard was the one setting it up.
Go build one.
Written by
Chris Bysocki
Dad of two (a 6-year-old daughter and a 3-year-old son), homeowner, and guy who learns most things the hard way. Writing about parenting, tools, yard work, and gear from a neighborhood in the real world.
More in this category
Ask Chris
Got a question about this topic — or anything dad-related? Send it over. I read every one.