How to Install a Basic Drip Irrigation System
Drip irrigation saves water, kills weeds, and means you stop hand-watering every other day. Here's how to plan and install one yourself.
The summer I put in a drip system, I almost didn’t. I figured it was too involved — too many fittings, too much planning, something that required a landscape contractor and a permit and probably a weekend I didn’t have. Then I spent an entire August hand-watering a garden bed every two days and finally hit my limit.
The whole install took one Saturday morning. I haven’t thought about watering since.
Why Drip Over Sprinklers
Sprinklers are great for lawns. For garden beds, raised beds, shrubs, and any area where you’re trying to grow specific plants, they’re the wrong tool. Here’s what drip does better:
Water goes where roots are, not where leaves are. Wet foliage is how you get fungal disease — powdery mildew, black spot, blight. Drip water goes into the soil at the root zone. Leaves stay dry. Plants stay healthier.
You use 30–50% less water. Sprinklers throw water into the air where it evaporates before hitting anything useful. Drip delivers water slowly and directly. The soil absorbs it before it can evaporate or run off.
Weeds lose. Weeds need water too, and a drip system only waters exactly where you want it. The spaces between plants stay dry. Weed germination drops significantly.
You stop watering by hand. This is the real reason.
Plan Before You Buy Parts
Fifteen minutes with a tape measure and a sketch on paper will save you two trips to the hardware store.
Map your beds. Measure the length and width of everything you want to water. Note the distances between your hose bib (or manifold point) and each zone. This tells you how much mainline tubing you need.
Count your plants. Each emitter services one plant. A drip system for a 4x8 raised bed with 12 tomato plants needs 12 emitters. A foundation shrub bed with 8 bushes needs 8. Write it down.
Decide on zones. One hose bib can run one zone at a time. If you’re watering a front bed and a back bed from the same bib, you’ll run them sequentially, not simultaneously. This is fine — you just need to know your layout before you spec parts.
Check your water pressure. Drip systems run best at 25–30 PSI. Most residential hose bibs come out of the wall at 40–80 PSI. You’ll need a pressure regulator (standard on most drip starter kits) or you’ll blow fittings off the line.
The Parts List
A basic drip system for one or two garden beds runs $50–$100 in parts. Here’s what you need:
| Part | What It Does | Notes |
|---|---|---|
| Backflow preventer | Stops garden water from siphoning back into your drinking supply | Required in most municipalities; often included in kits |
| Filter (150 mesh) | Catches sediment that clogs emitters | Don’t skip this |
| Pressure regulator | Drops pressure to 25–30 PSI | Usually pre-set; look for 25 PSI for emitters |
| Timer | Automates the whole thing | Get one — this is the whole point |
| 1/2” mainline tubing | Carries water from hose bib to your beds | Measure total run, buy 20% extra |
| 1/4” distribution tubing | Runs from mainline to individual plants | Flexible; usually sold by the foot or in 50 ft rolls |
| Emitters (drip emitters) | Deliver water at a fixed GPH rate | 1 GPH is standard for most vegetables and shrubs |
| Hole punch | Makes holes in the 1/2” mainline for barbed fittings | One tool, worth owning |
| Barbed fittings | Connects 1/4” tubing to mainline | Tee, elbow, and end cap styles |
| Stakes | Holds emitters in position at root zone | Usually included with emitters |
| End caps and figure-8 end closures | Plugs the end of mainline and distribution runs | One per line end |
Buy a starter kit first — brands like Rain Bird, DIG, or Raindrip sell kits with the backflow preventer, filter, regulator, and fittings together for around $30. Then buy tubing, emitters, and a timer separately based on your measurements.
On timers: a battery-powered hose-end timer costs $25–$40 and is the single best upgrade in a drip system. Set it once. It runs without you. The nicer models let you program multiple run times per day and skip-rain-delay functions. Worth every dollar.
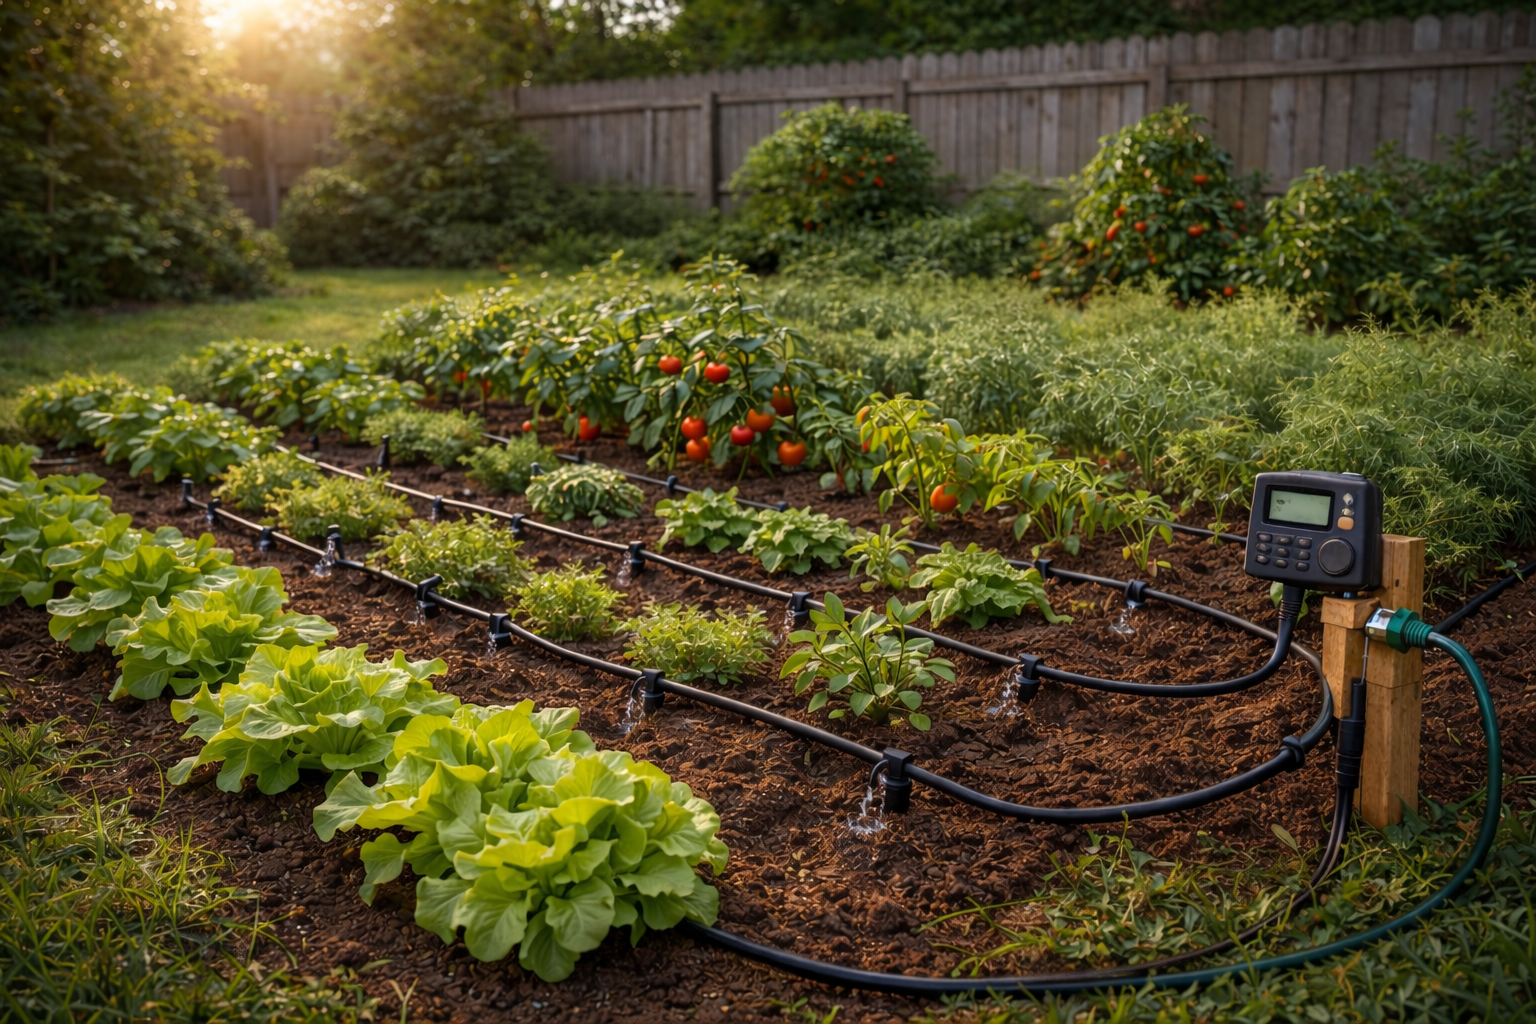
The Install
Step 1: Attach the assembly to your hose bib. Thread on the backflow preventer, then the filter, then the pressure regulator, in that order. Hand-tight plus a quarter turn with pliers. Don’t overtighten plastic threads — you’ll crack them.
Step 2: Connect your timer. Attach it between the hose bib and the backflow preventer, or at the bib before anything else depending on the model. Read the directions — timer placement matters for some units.
Step 3: Run the mainline. Roll out your 1/2” tubing from the hose bib connection to your first bed. Use tubing stakes to pin it to the ground every 3–4 feet. Run it along the edge of the bed or down the center, wherever gives you the shortest paths to your plants. Cut it with tubing cutters or sharp snips — straight cuts only; angled cuts leak.
Step 4: Punch holes and insert barbed fittings. Where you want a branch to a plant, use the hole punch to make a clean hole in the mainline. Press a barbed connector into the hole until it seats. It should snap in with some resistance. Wiggle-test each one — it should not pull out easily.
Step 5: Run distribution tubing to each plant. Cut a length of 1/4” tubing and push one end onto the barbed fitting. Route it to the plant, cut to length, and push the other end onto the emitter. Push the emitter stake into the soil right at the base of the plant, 2–4 inches from the stem. Repeat for every plant.
Step 6: Cap everything off. At the end of every mainline run, fold the tubing back on itself and secure it with a figure-8 end closure, or use a tubing end cap. Do the same on any distribution tubing that isn’t connected to an emitter. Uncapped lines will drain your water pressure and leave one section of the bed under-watered.
Step 7: Flush and test. Before programming the timer, turn the water on manually and let it run for two minutes. This flushes any dirt that got in during install. Walk the beds and watch each emitter — you’re looking for a slow, steady drip or small bubbling around the emitter head. A dry emitter means it’s clogged or kinked. A strong spray means your pressure regulator isn’t working or the emitter is cracked. Fix these before programming your schedule.
Setting Your Watering Schedule
This is the part most guides skip, and it’s where people either overwater or underwater and then blame the system.
Rule of thumb for established plants: 1–2 hours, 2–3 times per week in summer. Most vegetables at peak heat want around 1–1.5 inches of water per week. A 1 GPH emitter running for 90 minutes delivers 1.5 gallons per plant, which is plenty for a mature tomato or squash.
Adjust for conditions. Sandy soil drains fast — shorter, more frequent runs. Clay soil holds water longer — longer, less frequent runs. Deep-rooted plants like shrubs can go longer between waterings than shallow-rooted annuals.
Water in the morning. Soil absorbs better, and any splash that does occur dries before evening, which reduces fungal pressure. Avoid watering between noon and 4 PM in summer heat — evaporation steals the water before it soaks in.
Back off in fall. Once temperatures drop below 60°F consistently, most plants need significantly less water. Program a fall schedule or start monitoring manually and running the system only when things look dry.
If you’re running drip in a raised garden bed, cut the run time by 15–20% compared to in-ground — the contained soil and good drainage in raised beds means plants get water more efficiently.
Common Mistakes
Forgetting to flush before running the timer. Dirt in the line will clog emitters in the first week. Two minutes of manual flushing prevents this.
Skipping the pressure regulator. High pressure pops barbed fittings right out of the mainline and turns the whole system into a low-budget sprinkler show.
Running too long per session. More water isn’t better. Soggy soil drives roots up toward the surface instead of down. Shallow roots mean weak plants and increased drought stress.
Not checking emitters mid-season. Emitters clog over time — mineral deposits, algae, dirt. Every few weeks, turn the system on and walk the beds. Any dry spots mean an emitter needs to be cleared or replaced. Replacements cost about $0.50 each.
Not winterizing. Before the first freeze, disconnect everything, drain the lines, and bring the timer, filter, and pressure regulator inside. Frozen water in tubing cracks fittings and destroys rubber seals. The whole system disassembles in ten minutes — do it once in fall, store the parts together in a bag, and you’re set for the following spring.
The first time you come back from a week away and find everything green and alive — kids haven’t touched it, you haven’t thought about it once — that’s when drip irrigation earns its install fee ten times over.
One Saturday. Worth it every year after.

Written by
Chris Bysocki
Dad of two (a 6-year-old daughter and a 3-year-old son), homeowner, and guy who learns most things the hard way. Writing about parenting, tools, yard work, and gear from a neighborhood in the real world.
More in this category
Ask Chris
Got a question about this topic — or anything dad-related? Send it over. I read every one.